So, you’ve mastered the blinking LED. You can make lights flash, dance, and maybe even fade. But what if your Arduino could actually talk to you?
What if it could tell you the exact temperature in your room, display a secret passcode, or just say hello? That’s where the 16×2 LCD Display comes in. It’s one of the coolest and easiest ways to take your electronics projects to the next level.
Let’s dive into what this awesome little screen is, how it works, and how you can code your very first display project!
Why is the 16×2 LCD So Useful?
Imagine playing a video game without a screen—you wouldn’t know your score, your health, or what level you’re on! Your Arduino projects are the same way.
Without a screen, your Arduino is doing a lot of hard work in secret. A 16×2 LCD (Liquid Crystal Display) is like a mini-monitor for your project. It is super useful because:
• It shows data in real-time: Reading a temperature sensor? Print the exact degrees right on the screen.
• It helps you debug: If your code isn’t working, you can make the screen print out messages so you know exactly what the Arduino is thinking.
• It makes projects interactive: You can build digital clocks, mini-games, or custom calculators.
LCD 16×2 the Pins
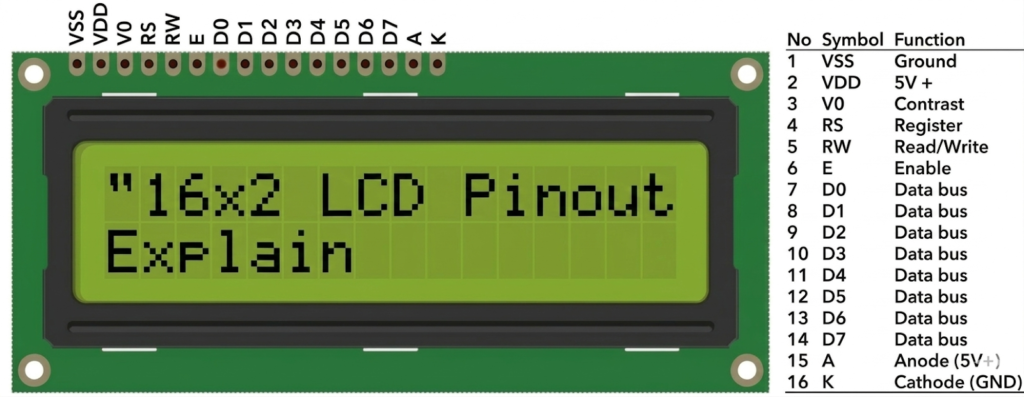
If you look at the top of your LCD, you’ll see 16 little metal holes or pins. Don’t worry, we don’t use all of them for the data! Here is the “beginner-friendly” version of what the main ones do:
• VSS & VDD: These are the “Power Pins.” They give the screen electricity to turn on.
• V0: This is the “Contrast Pin.” We connect this to our knob (potentiometer) so we can see the letters clearly.
• RS, E, D4, D5, D6, D7: These are the “Brain Pins.” They carry the messages from the Arduino to the screen.
• A & K: These are for the “Backlight.” They make the screen glow so you can see it in the dark!
What You Need:
• 1x Arduino Uno
• 1x 16×2 LCD Display
• 1x 10k Potentiometer (This is a little twisty knob used to adjust the screen’s contrast so you can see the letters clearly!)
• A breadboard and some jumper wires
Circuit Diagram
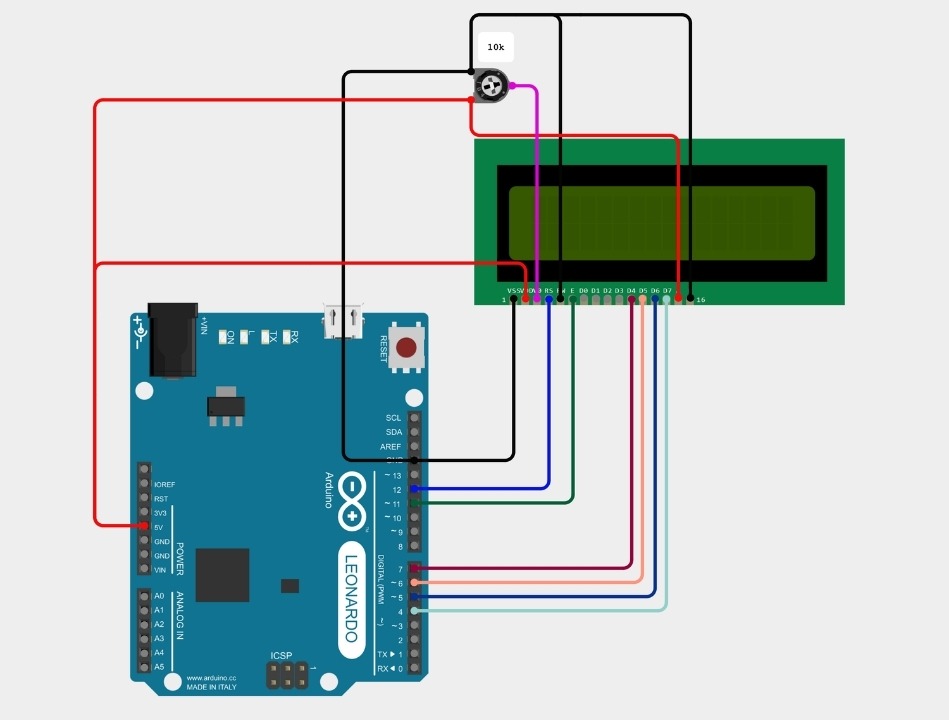
1. Power the Breadboard: Connect the Arduino 5V to the red (+) rail on your breadboard and GND to the blue (-) rail.
LCD Power: Connect LCD Pin 1 (VSS) to GND and Pin 2 (VDD) to 5V.
2. The Magic Knob: Place your potentiometer on the breadboard. Connect one side pin to 5V, the other side pin to GND, and the middle pin to LCD Pin 3 (V0).
3. The Data Pins:
| LCD Pins | Arduino Pins |
| LCD Pin 4(RS) | D12 |
| LCD Pin 6(E) | D11 |
| LCD Pin 11(D4) | D5 |
| LCD Pin 12(D5) | D4 |
| LCD Pin 13(D6) | D3 |
| LCD Pin 14(D7) | D2 |
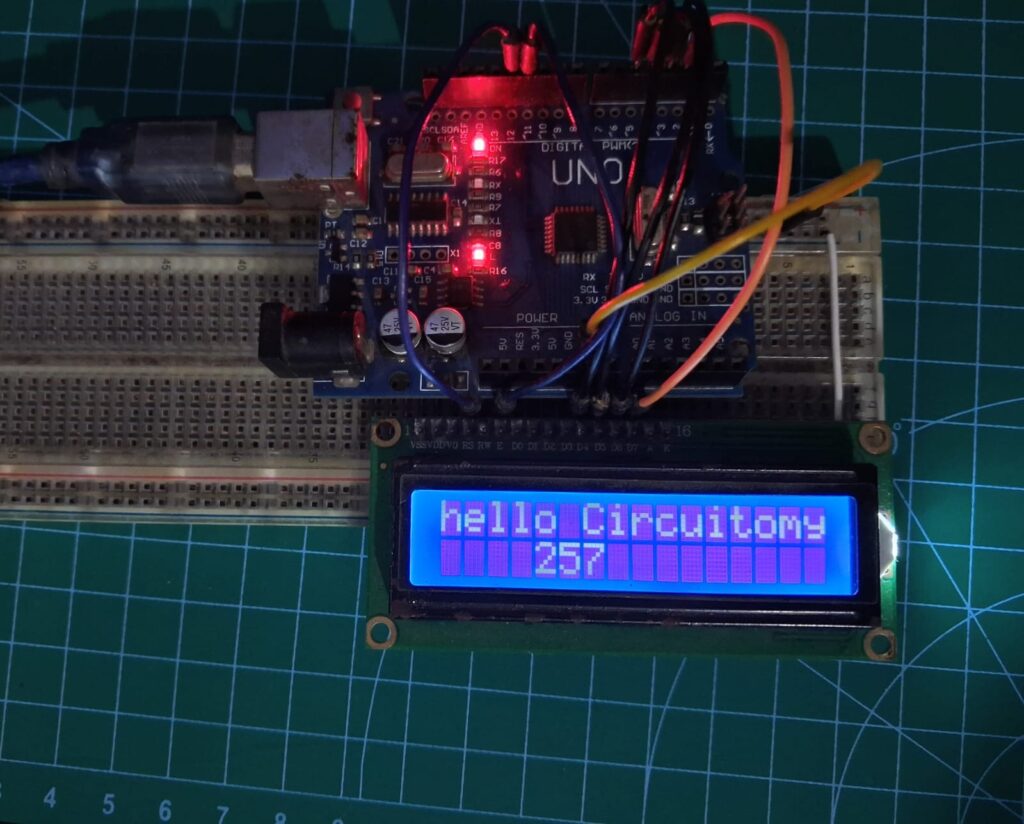
Fun Project: The “Hello Circuitomy” Counter
Let’s build a classic beginner project. We are going to make the screen display a custom welcome message and a live timer that counts how many seconds the Arduino has been turned on.
The Code
Once you have everything wired up , open your Arduino IDE and type in this code:
// Include the library code. This tells the Arduino how to talk to the screen!
#include <LiquidCrystal.h>

// Tell the Arduino which pins are connected to the LCD
LiquidCrystal lcd(12, 11, 5, 4, 3, 2);

void setup() {
  // Set up the LCD's number of columns and rows:
  lcd.begin(16, 2);

  // Print our welcome message to the LCD on the top row.
  lcd.print("hello Circuitomy");
}

void loop() {
  // Move the cursor to column 4, line 1
  // (Note: line 1 is the SECOND row, because computers start counting at 0!)
  lcd.setCursor(4, 1);

  // Print the number of seconds since the Arduino was reset:
  lcd.print(millis() / 1000);
}Breaking Down the Code:
• #include <LiquidCrystal.h>: This is like downloading an app. It gives your Arduino the special instructions it needs to use the screen.
• lcd.begin(16, 2): This tells the Arduino exactly what size screen we are using.
• lcd.print(): This is the fun part! Whatever you put inside the quotation marks will show up on the screen.
• lcd.setCursor(0, 1): This tells the screen where to start typing next. We told it to go to the very first space (0) on the bottom row (1).
Upload the code, twist your potentiometer until the letters become clear, and watch your Arduino come to life!