Have you ever wondered how your phone knows how bright or dark it is in the room? Or how a video game controller knows how far you’ve turned the joystick? With Arduino, you can learn to do the same thing! Using a special command called Analog Read, you can measure real-world things like light, temperature, or how much a dial is turned.
Arduino converts these readings into numbers between 0 and 1023, which means you can get detailed information instead of just “on” or “off.” It’s like giving your projects eyes and ears to sense what’s happening around them!
The analogRead() command allows the Arduino to measure varying voltage levels. Unlike digitalRead(), which only reads HIGH (on) or LOW (off), analogRead() reads a range of values from a sensor connected to an analog input pin. This is particularly useful for sensors like temperature sensors, potentiometers, light-dependent resistors (LDRs), and more.
Analog Read
1. Choose a Pin: You can use analogRead(Pin) on specific pins labeled A0, A1, A2, and so on, depending on your Arduino board. On an Arduino UNO, there are six analog pins: A0 to A5.
2. Read the Voltage: Use analogRead(Pin) to measure the voltage at the specified pin. This converts the analog voltage (between 0V and 5V) into a digital value between 0 (representing 0V) and 1023 (representing 5V).
Analog Read Example: Reading a Potentiometer Analog Values
Hardware Requirements
1x Arduino UNO
1x 10k Potentiometer
1x Breadboard
Some jumper
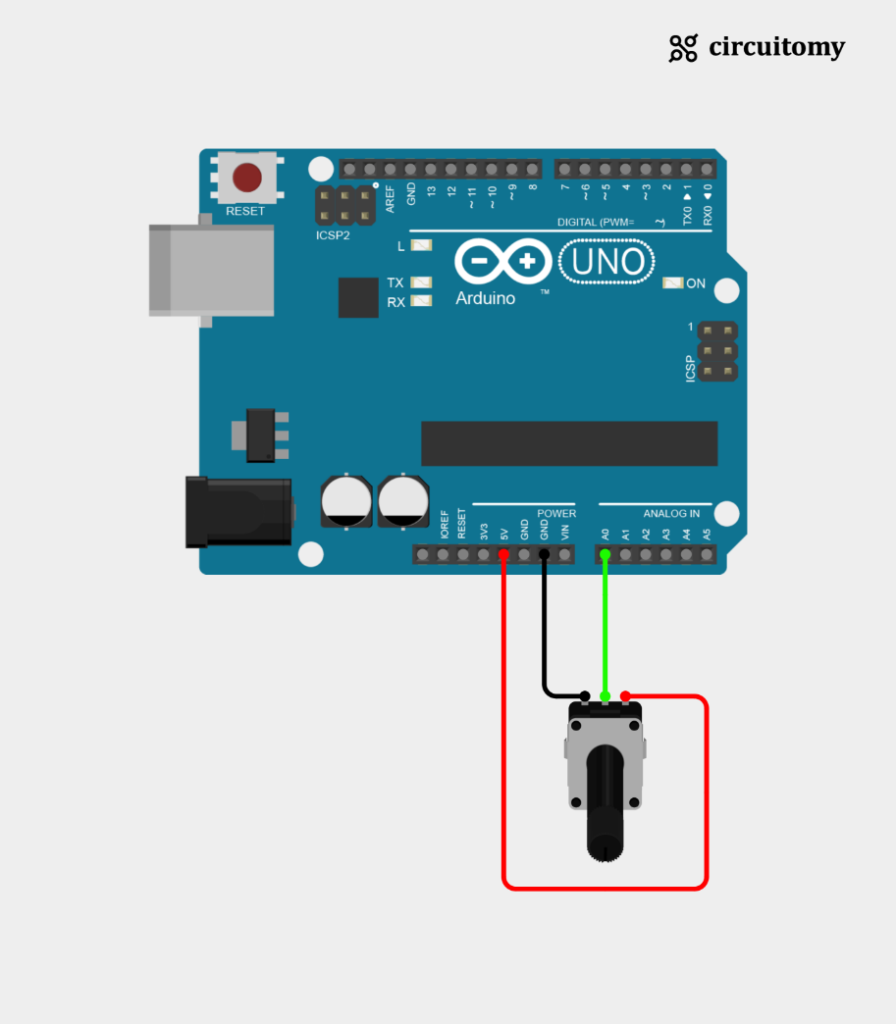
Circuit Diagram

Fig: Interfacing Potentiometer(Pot) with Arduino
Potentiometer(Pot) Connection:
| Potentiometer(Pot) Pin | Arduino Pin |
| Pot One side pin | 5V |
| Pot other side pin | GND |
| Pot middle pin | A0 (analog pin 0) |
Code
// Set the analog pin number

int sensorPin = A0;
int sensorValue = 0;


void setup() {
  // Initialize serial communication to see the output on the serial monitor
  Serial.begin(9600);
}


void loop() {
  // Read the value from the potentiometer
  sensorValue = analogRead(sensorPin);

  // Print the sensor value to the serial monitor
  Serial.println(sensorValue);

  delay(500); // Delay for half a second
}
1. Set the PIN Number
int sensorPin = A0;
int sensorValue = 0;
I) sensorPin= A0; sets A0 as the pin to read the analog value
II) sensorValue= 0; creates a variable to store the value read from the sensor.
2. Setup Function
void setup() {
  Serial.begin(9600);
}
Serial.begin(9600); starts serial communication at 9600 baud, so you can see the readings on the serial monitor
3. Loop Function
void loop() {
  // Read the value from the potentiometer
  sensorValue = analogRead(sensorPin);

  // Print the sensor value to the serial monitor
  Serial.println(sensorValue);

  delay(500); // Delay for half a second
}
sensorValue = analogRead(sensorPin);Reads the voltage from pin A0 and assigns it a value between 0 and 1023, where 0 corresponds to 0V and 1023 corresponds to 5V.
Serial.println(sensorValue);Prints the sensor value to the Serial Monitor, so you can observe the reading.
delay(500);Pauses the loop for half a second to make the output easier to read.
Terminal:

