Are you sweating in your room right now, or freezing? Instead of guessing the temperature, why not build a gadget that tells you exactly how hot your gaming setup is getting?
Today, we are building a Digital Desk Thermometer. We’re going to take a real-world physical thing (heat) and translate it into a digital number on a screen. To do this, we are upgrading our arsenal with two incredibly powerful tools: the LM35 Temperature Sensor and an I2C LCD Display.
Let’s get building!
The Hardware
• Arduino Nano (The brain)
• LM35 Temperature Sensor (The thermometer)
• 16×2 LCD Display WITH an I2C Backpack (The screen)
• Jumper Wires & Breadboard
Wait, what is an “I2C Backpack“?
Remember how wiring a standard LCD required a chaotic bird’s nest of 12+ wires and a confusing twisty knob? The I2C module is a tiny black circuit board soldered to the back of the screen that does all the heavy lifting for you. It takes those 16 pins and crushes them down to just 4 wires. It is basically magic!
Phase 1: The Wiring (Wire-Taming Mode)
This circuit is so clean, you’ll be done in 60 seconds.
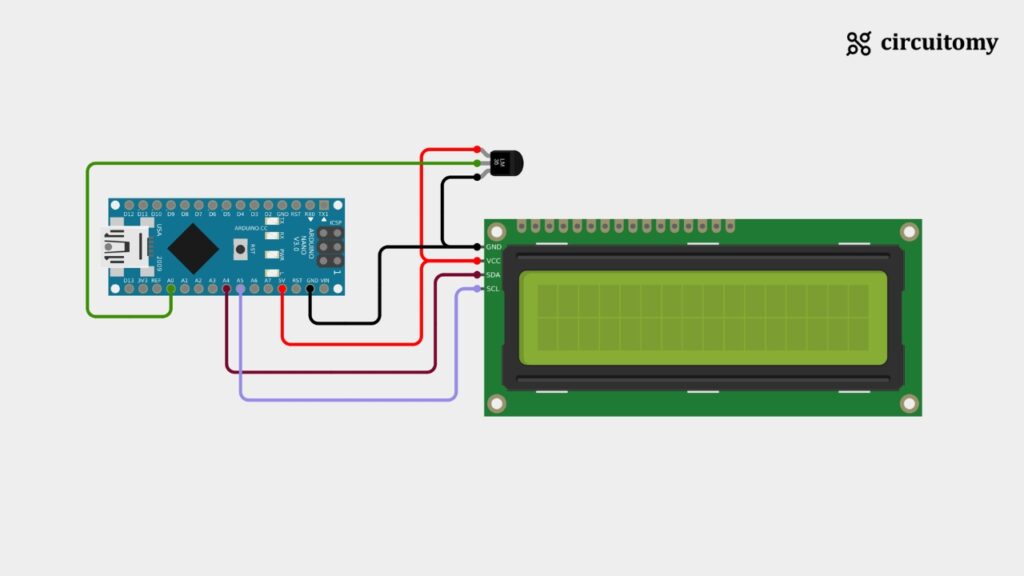
🔌 Connecting the I2C LCD (Only 4 Wires!)
• GND ➔ Arduino GND
• VCC ➔ Arduino 5V
• SDA (Data) ➔ Arduino Analog Pin A4
• SCL (Clock) ➔ Arduino Analog Pin A5
🌡️ Connecting the LM35 Sensor
Hold the sensor so the flat side with the writing is facing you.
• Left Pin ➔ Arduino 5V
• Middle Pin ➔ Arduino Analog Pin A0 (This sends the temperature data to the brain!)
• Right Pin ➔ Arduino GND
💻 Phase 2: The Code (Translating Heat into Math)
To make the I2C screen work, you need to download a quick library. In your Arduino IDE, go to Sketch > Include Library > Manage Libraries, search for “LiquidCrystal I2C” (by Frank de Brabander), and install it.
Or click here LiquidCrystal I2C library and download the zip file. Go to Sketch > Include Library > Add .ZIP Library . Select your downloaded .zip file and click Open.Look at the bottom of the Arduino IDE screen—you will see a message confirming the library was successfully added!
Now, copy this code and hit upload:
#include <Wire.h>
#include <LiquidCrystal_I2C.h>

// Set the LCD I2C address to 0x27 for a 16 chars and 2 line display
LiquidCrystal_I2C lcd(0x27, 16, 2);

int sensorPin = A0; // The pin the LM35 is connected to

void setup() {
  lcd.begin();      // Turn on the LCD
  lcd.setCursor(0, 0);
  lcd.print("Room Temp:"); // Print our static title
}

void loop() {
  // 1. Read the raw data from the sensor (A number between 0 and 1023)
  int rawReading = analogRead(sensorPin);

  // 2. Convert that raw number into Voltage
  float voltage = rawReading * (5.0 / 1024.0);

  // 3. Convert the Voltage into Celsius! (The LM35 gives 10mV per degree)
  float tempC = voltage * 100.0;

  // Print the temperature on the second row
  lcd.setCursor(0, 1);
  lcd.print(tempC);
  lcd.print(" C      "); // The spaces clear out any leftover numbers

  delay(1000); // Wait 1 second before updating the screen again
}How Did We Do That Math? (The Secret Sauce)
You might be looking at float tempC = voltage * 100.0; and wondering where that came from.
The LM35 is an analog sensor. It doesn’t speak in computer code; it speaks in electricity. For every 1 degree Celsius the room heats up, the middle pin sends exactly 10 extra millivolts to the Arduino. Our code simply catches that electricity, measures the voltage, and multiplies it to reveal the true temperature. You just turned your Arduino into a digital multimeter!
🎮 Your Next Challenge
Now you have a working real-time thermometer. But let’s make it a smart home device!
The Challenge: Can you add a Red LED to pin 8 and a Green LED to pin 9? Try writing an if / else statement in your loop so the Green LED stays on when your room is cool, but the Red LED flashes an alarm if the temperature goes over 28°C!