In this tutorial, we’ll learn how to connect and use an IR (Infrared) Sensor Module with an Arduino UNO board. IR sensors are versatile devices used for detecting objects, motion, or proximity by emitting and receiving infrared light. You can use them in applications like obstacle detection, proximity alarms, and line-following robots. Let’s get started!
Introduction to IR Sensor Module
The IR (Infrared) Sensor Module is a specialized sensor designed to detect obstacles using infrared light, making it ideal for proximity sensing and obstacle-avoidance systems. This module is built around the LM393 comparator IC, which processes the sensor signals and provides a reliable digital output for obstacle detection

Working Principle
The sensor works based on infrared reflection. When there are no obstacles, the infrared light it emits gradually weakens as it travels further, eventually fading away.
However, if there’s an obstacle, the infrared light reflects back to the sensor. The sensor detects this reflected signal, indicating the presence of an object. The detection range can be adjusted using the built-in potentiometer.
Hardware Requirements
1x Arduino UNO
1x IR Sensor Module
1x breadboard
Some jumper wire
Circuit Diagram

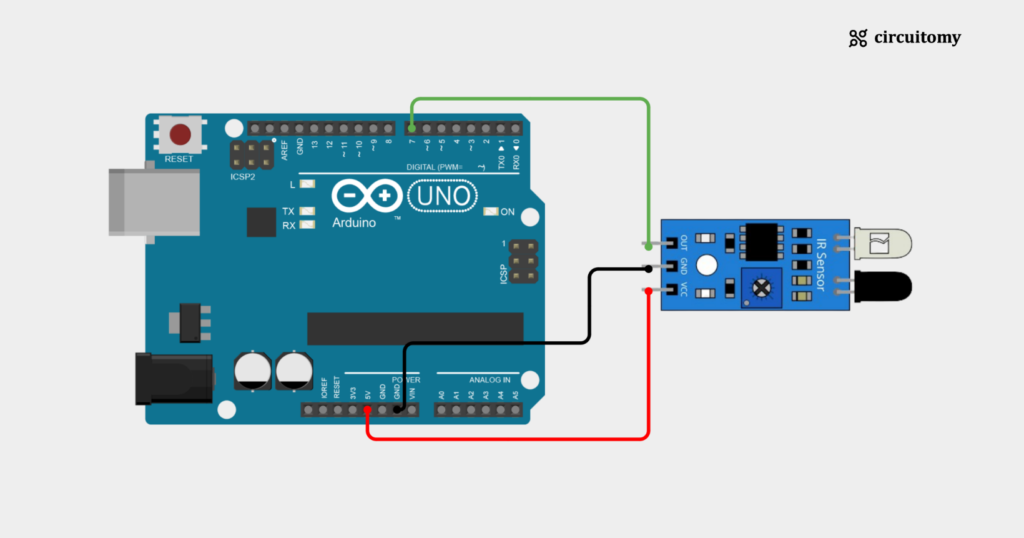
Fig: Interfacing IR Sensor with Arduino
IR Sensor Configuration
| IR Sensor Pin | Arduino Pin |
| VCC | 5V |
| GND | GND |
| OUT | D7 (Digital Pin 7) |
Code
// Define the pin for the IR sensor
int irSensorPin = 7;  // IR sensor connected to digital pin 7
int irSensorState = 0; // Variable to store the state of the sensor

void setup() {
  // Initialize serial communication
  Serial.begin(9600);

  // Set the IR sensor pin as input
  pinMode(irSensorPin, INPUT);
}

void loop() {
  // Read the state of the IR sensor (HIGH or LOW)
  irSensorState = digitalRead(irSensorPin);

  // If the sensor detects an object (LOW state)
  if (irSensorState == LOW) {
    Serial.println("Object detected");
  } else {
    Serial.println("No object detected");
  }

  delay(500);
}
1. Set the PIN Number
int irSensorPin = 7;
int irSensorState = 0;
irSensorPin = 7; : The IR sensor is connected to digital pin 7 of the Arduino board. This pin will be used to read whether the sensor detects an object or not.
irSensorState : This variable is used to store the current reading from the IR sensor (whether the sensor is detecting an object or not).
2. Setup Function
void setup() {
  // Initialize serial communication
  Serial.begin(9600);

  // Set the IR sensor pin as input
  pinMode(irSensorPin, INPUT);
}
Serial.begin(9600); :Initializes serial communication with the computer at a baud rate of 9600 bits per second. This is used to send and receive data from the Serial Monitor, allowing you to see the output (messages) on your computer.
pinMode(irSensorPin, INPUT); : Configures the irSensorPin (pin 7) as an input pin, as the sensor will provide a signal (HIGH or LOW) that the Arduino needs to read.
3. Loop Function
void loop() {
  irSensorState = digitalRead(irSensorPin);
digitalRead(irSensorPin); : Reads the current signal from the IR sensor pin. The sensor outputs HIGH when no object is detected and LOW when an object is detected. The result is stored in the variable
4. Conditional Check and Serial Output
  // If the sensor detects an object (LOW state)
  if (irSensorState == LOW) {
    Serial.println("Object detected");
  } else {
    Serial.println("No object detected");
  }
if (irSensorState == LOW) : If the IR sensor detects an object (returns LOW), it prints “Object detected” to the Serial Monitor.
else : If the sensor doesn’t detect an object (returns HIGH), it prints “No object detected” to the Serial Monitor.
Code Flow Summary:
I) The sensor pin is initialized as an input, and the serial communication is set up.
II) The program continuously reads the IR sensor’s state.
III) Based on whether the sensor detects an object (LOW) or not (HIGH), a message is printed to the Serial Monitor.
IV) The process repeats every 500 milliseconds.
Serial Terminal:

