Welcome to your next Arduino adventure! In this tutorial, we’re going to learn how to use an LM35 temperature sensor with an Arduino to measure the temperature. Don’t worry if you’re new to this—I’ll make it easy to understand!
The LM35 is a small device that senses temperature. You can think of it as a thermometer that connects to electronics like the Arduino. It’s useful because it gives a temperature reading as a voltage, which our Arduino can read and understand.
Why is it cool?
I) It measures temperature in Celsius.
II) It doesn’t need extra parts to work with the Arduino.
III) It’s small, cheap, and easy to use in your projects.
LM35 Working Principle:
The LM35 sensor measures temperature and converts it to voltage. For every 1 degree Celsius, the LM35 output changes by 0.01 volts. That means if it’s 25°C, the output voltage will be 0.25V (25 x 0.01V). The Arduino reads this voltage and converts it back to a temperature that we can display on our screen.
LM35 Specifications and Pinout:
Here are a few important details about the LM35:
I) Temperature Range: 0°C to 100°C
II) Output Voltage: 0.01 volts for each degree Celsius
III) Power Supply: 4V to 20V (we’ll use 5V from Arduino)
IV) Accuracy: ±0.5°C (quite accurate for simple projects!)
Pinout :

Hardware Requirements
1x Arduino
1x LM35 Temperature Sensor
1x breadboard
Some jumper wire
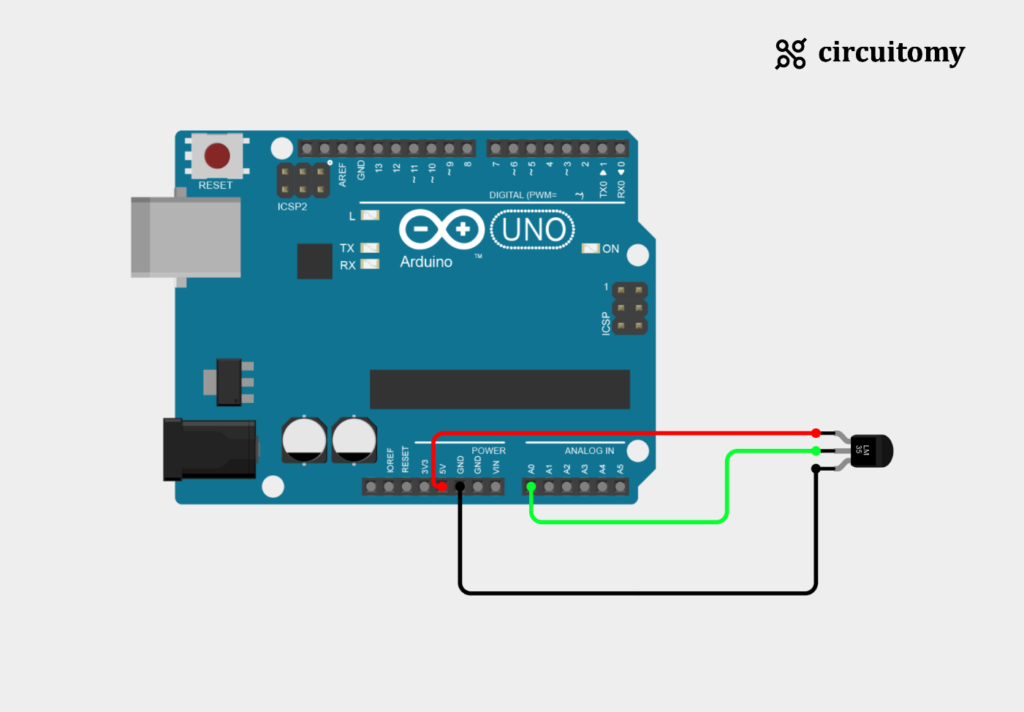
Circuit Diagram

Fig: Interfacing LM35 Temperature Sensor with Arduino
LM35 Sensor Configuration
| LM35 Sensor Pin | Arduino Pin |
| VCC | 5V |
| OUT | A0 (Analog Pin 0) |
| GND | GND |
Now it’s time to program the Arduino to read the temperature.
Open the Arduino IDE.
Create a new sketch and paste the following code:
Code
// Set the analog pin where the LM35 is connected
const int sensorPin = A0;

void setup() {
  Serial.begin(9600); // Start serial communication
}

void loop() {
  // Read the voltage from the LM35
  int sensorValue = analogRead(sensorPin);

  // Convert the analog reading to voltage (0 - 5V)
  float voltage = sensorValue * (5.0 / 1023.0);

  // Convert voltage to temperature (in Celsius)
  float temperature = voltage * 100;

  // Print the temperature to the Serial Monitor
  Serial.print("Temperature: ");
  Serial.print(temperature);
  Serial.println(" °C");

  delay(1000); // Wait 1 second before next reading
}
float voltage = sensorValue * (5.0 / 1023.0);1. analogRead(sensorPin); : The analogRead function reads the signal from the LM35 sensor. This reading is a number between 0 and 1023 because the Arduino’s analog-to-digital converter (ADC) is 10-bit, meaning it divides the input voltage range (0 to 5V) into 1024 steps (from 0 to 1023).
2. Convert to Voltage:
I) The formula sensorValue * (5.0 / 1023.0) converts this 0-1023 reading into a voltage value.
II) Why (5.0 / 1023.0)?
a) The value 5.0 represents the reference voltage (5V) of the Arduino.
b) Dividing by 1023.0 scales the 0–1023 range to a 0–5V range.
III) So, for example, if the sensorValue is 512, the calculation would be
voltage=512×(5.0/1023.0)≈2.5 volts
This means that an analog reading of 512 corresponds to 2.5 volts.
float temperature = voltage * 100;The LM35 sensor outputs a voltage that changes by 0.01 volts for every degree Celsius (°C). Therefore, to get the temperature in Celsius:
1. Multiply by 100
I) Each volt represents 100°C, so each 0.01V equals 1°C.
II) By multiplying the voltage by 100, we convert the voltage to temperature in Celsius.
How the Code Works
I) Setup: We start by setting up the communication so we can see the results on the Serial Monitor.
II) Reading the Sensor: We read the output voltage from the LM35.
III) Calculating Temperature: We convert the voltage to Celsius. The LM35 outputs 0.01V per degree, so we multiply by 100 to get the temperature.
IV) Displaying Temperature: Finally, we print the temperature on the Serial Monitor.
Terminal:

