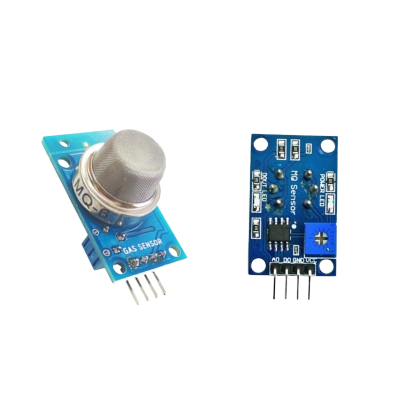
Have you ever been curious about how devices detect gas leaks? With the MQ-6 gas sensor, you can create your very own gas detection system! This amazing sensor can identify gases like LPG, butane, and propane—common fuels used in cooking and heating. Let’s dive into an exciting and simple project to learn how to use the MQ-6 with an Arduino.
How the MQ-6 Sensor Works
The MQ-6 sensor has a tiny part inside called a sensing element. When there’s gas in the air, this part reacts with it, causing the sensor to send a signal to the Arduino. The more gas in the air, the stronger the signal.
The sensor has two types of outputs:
1. Analog Output (AO): Shows the amount of gas in the air.
2. Digital Output (DO): Tells if the gas level is above a set limit (like a simple ON/OFF switch).

Specifications
| Parameter | Value |
| Operating Voltage | 5V ± 0.1V |
| Detection Range | 200 – 10,000 ppm (parts per million) |
| Preheat Time | 20 seconds to 2 minutes |
| Output Type | Analog (AO) and Digital (DO) |
| Sensitivity | Detects LPG, butane, propane, methane |
Sensor pinout:

Hardware Requirements
1x Arduino
1 x Buzzer
1x MQ-6 Gas Sensor
1x breadboard
Some jumper wire
A Small Lighter (for testing, under adult supervision)
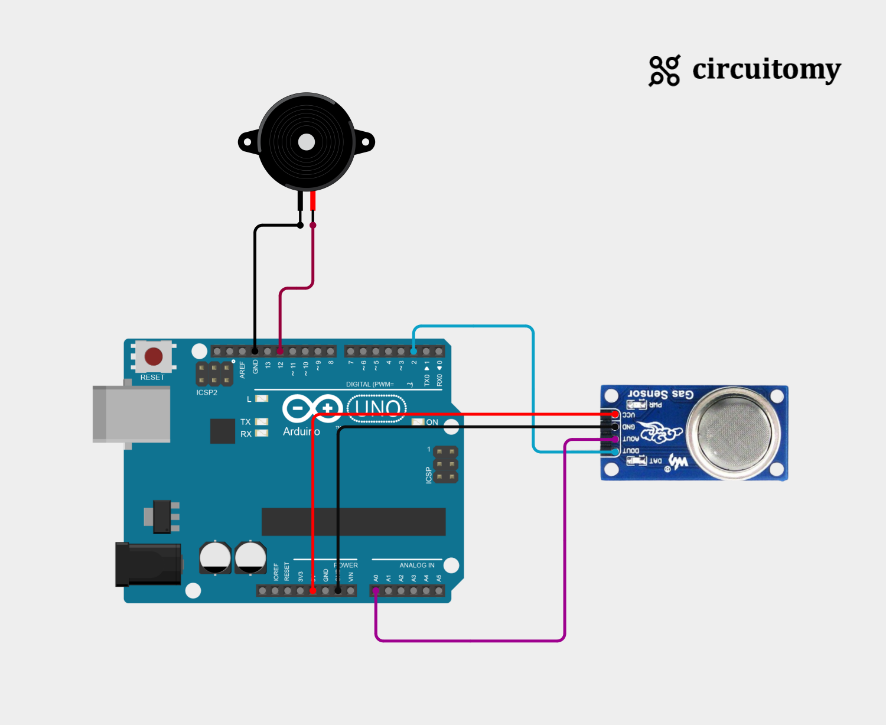
Circuit Diagram

Interfacing MQ-6 Gas Sensor with Arduino
MQ-6 Sensor Configuration
| MQ-6 Gas Sensor Pin | Arduino Pin |
| VCC | 5V |
| GND | GND |
| D0 | D2 (Digital Pin 2) |
| A0 | A0 (Analog Pin 0) |
Buzzer Configuration
| Buzzer pin | Arduino Pin |
| Positive Leg Pin | D12 (Digital Pin 12) |
| Negative Leg Pin | GND |
Code
const int analogPin = A0; // Connect AO to A0
const int digitalPin = 2; // Connect DO to D2
const int alertPin = 3;   // Buzzer or LED (optional)

void setup() {
  Serial.begin(9600); // Start serial communication
  pinMode(digitalPin, INPUT);
  pinMode(alertPin, OUTPUT);
}

void loop() {
  int gasLevel = analogRead(analogPin); // Read gas level from Analog Pin
  Serial.print("Gas Level: ");
  Serial.println(gasLevel);

  int threshold = digitalRead(digitalPin); // Check threshold from digital Pin
  if (threshold == HIGH) {
    Serial.println("Gas level is too high!");
    digitalWrite(alertPin, HIGH); // Turn on buzzer or LED
  } else {
    digitalWrite(alertPin, LOW); // Turn off buzzer or LED
  }

  delay(100); // Wait 100 millisecond
}
1. Variables Declaration
const int analogPin = A0; // Connect AO to A0
const int digitalPin = 2; // Connect DO to D2
const int alertPin = 3;   // Buzzer or LED (optional)
I) analogPin: Reads the gas level as an analog signal, providing a range of values.
II) digitalPin: Reads a digital signal (HIGH/LOW) to indicate whether the gas level exceeds a preset threshold.
III) alertPin: Controls a buzzer or LED to signal if the gas level is too high
2. Setup Function
void setup() {
  Serial.begin(9600); // Start serial communication
  pinMode(digitalPin, INPUT);
  pinMode(alertPin, OUTPUT);
}
I) Serial.begin(9600): Starts communication with the computer so data can be sent to the Serial Monitor.
II) pinMode(digitalPin, INPUT):Configures the digital pin to read the sensor’s threshold output.
III) pinMode(alertPin, OUTPUT):Prepares the alert pin to control a buzzer or LED.
3. Main Loop
void loop() {
  int gasLevel = analogRead(analogPin); // Read gas level from Analog Pin
  Serial.print("Gas Level: ");
  Serial.println(gasLevel);
I) analogRead(analogPin): Reads the gas concentration as a numerical value from the sensor’s analog output. The value typically ranges from 0 to 1023.
II) The gas level is displayed on the Serial Monitor for real-time monitoring.
  int threshold = digitalRead(digitalPin); // Check threshold from digital Pin
  if (threshold == HIGH) {
    Serial.println("Gas level is too high!");
    digitalWrite(alertPin, HIGH); // Turn on buzzer or LED
  } else {
    digitalWrite(alertPin, LOW); // Turn off buzzer or LED
  }

  delay(100); // Wait 100 millisecond
}
I) digitalRead(digitalPin): Reads the digital pin to check if the gas level exceeds the sensor’s preset threshold.
II) if (threshold == HIGH): If the sensor’s digital output is HIGH, it indicates the gas level is too high:
a) A warning message is sent to the Serial Monitor.
b) The buzzer or LED connected to the alert pin is activated (turned on).
III) else: If the gas level is below the threshold:
IV) The alert signal (buzzer/LED) is turned off.
V) delay(100): Introduces a short pause (100 milliseconds) before repeating the loop.
How It Works
1. The analog output (AO) provides a continuous reading of gas concentration, which you can monitor via analogRead().
2.The digital output (DO) indicates whether the gas concentration exceeds a preset threshold. This threshold can be adjusted using the onboard potentiometer.
3.The code includes an optional buzzer or LED to provide alerts.
Calibration
1. Connect the sensor and let it warm up for 2–5 minutes.
2. Adjust the potentiometer on the sensor module to set the desired threshold.
Serial Terminal:

Serial Plotter:

