The TTP223 touch sensor is a cool little sensor that lets you turn on lights, control motors, or activate different functions just by touching it. It’s like a magic button that senses when your finger is near it and sends a signal to the Arduino. Imagine using just a touch instead of pressing a button – that’s what this sensor lets you do!
TTP223 Working Principle
The TTP223 capacitive touch sensor works by using a principle called capacitive sensing. At its core, the sensor has a conductive pad that can detect changes in electrical charge when something conductive, like a human finger, comes close. Under normal conditions, this pad remains in a resting state, meaning it’s not detecting anything. However, when you bring your finger near or touch the sensor, it alters the electric field around the pad. This happens because our bodies can hold a small amount of electric charge, which changes the capacitance (or stored electric charge) on the sensor.
When this change is detected, the TTP223 identifies it as a “touch” and sends a signal to the connected device (like an Arduino) to let it know that it has been activated. The sensor’s output pin will go “high” (meaning it turns on) whenever a touch is detected, and it will go back to “low” (off) when your finger is removed.
This is the same basic technology used in touchscreens, allowing us to interact with devices just by touch. The TTP223 sensor brings this familiar touch technology to Arduino projects, making it a simple and effective way to add touch control to DIY electronics.
Specifications of TTP223 Sensor
I) Operating Voltage: 2.0V to 5.5V
II) Size: Very small, easy to use in projects
III) Output: High or low (on/off signal)
IV) Touch Sensitivity: About 0-5mm (perfect for fingers)
This sensor uses very low power, which means it won’t drain your battery quickly if you’re using one.
Pinout of TTP223 Sensor

Hardware Requirements
1x Arduino
1 x LED
1x 220R
1x TTP223 Touch Sensor
1x breadboard
Some jumper wire
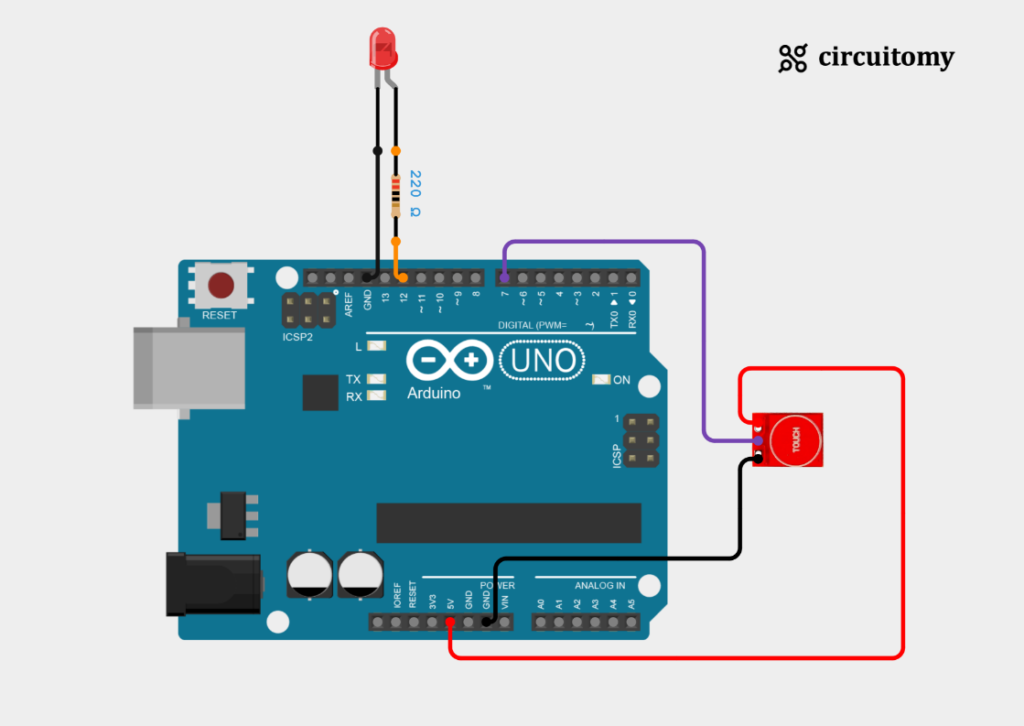
Circuit Diagram

Fig: Interfacing TTP223 Capacitive Touch Sensor with Arduino
LED Configuration
| LED Pin | Arduino Pin |
| LED’s Positive (Anode) Pin | D12 (Digital Pin 12) |
| LED’s Negative (Cathode) Pin | GND |
TTP223 Touch Sensor Configuration
| TTP223 Touch Sensor | Arduino Pin |
| VCC | 5V |
| GND | GND |
| OUT | D7 (Digital Pin 7) |
Now it’s time to program the Arduino to read the temperature.
Open the Arduino IDE.
Create a new sketch and paste the following code:
Code
int touchPin = 7; // TTP223 OUT pin connected to pin 7 on the Arduino
int ledPin = 12;  //  LED connected to pin 12 on the Arduino

void setup() {

  Serial.begin(9600); // Start serial communication
  pinMode(touchPin, INPUT);  // Set touch sensor pin as input
  pinMode(ledPin, OUTPUT);   // Set LED pin as output

}

void loop() {

  int touchState = digitalRead(touchPin);  // Read the sensor's state

  if (touchState == HIGH) {                // If the sensor is touched

    digitalWrite(ledPin, HIGH);            // Turn the LED on
    Serial.println("TTP223 Button Touch ON");
    delay(100);

  } else {

    digitalWrite(ledPin, LOW);             // Turn the LED off
    Serial.println("TTP223 Button Touch OFF");
    delay(100);
  }
}
Summary of the code:
I) Setup: Sets the touch sensor (touchPin) as an input and the LED (ledPin) as an output. Starts serial communication.
II) Loop
a) Reads the sensor state (touchState).
b) If touched (HIGH), turns on the LED, prints “TTP223 Button Touch ON” to the Serial Monitor, and pauses for 100ms.
c) If not touched (LOW), turns off the LED, prints “TTP223 Button Touch OFF” to the Serial Monitor, and pauses for 100ms.
Overall Function: This code turns the LED on and off based on whether the TTP223 sensor is touched. Additionally, it sends a message to the Serial Monitor, showing whether the sensor is touched or not. The delay(100); helps debounce the touch sensor, providing a smoother response by preventing rapid on/off switching.
Terminal:

Congratulations! You’ve learned how to connect and use the TTP223 capacitive touch sensor with an Arduino. This sensor lets you easily add a touch-sensitive button to your projects, just like the ones on touchscreens. By following this tutorial, you now know the basics of the TTP223 sensor, including its working principle, pin connections, and how to program it with an Arduino. Have fun experimenting and adding touch functionality to your own Arduino projects!
